I recently worked with a young patient with a C6/7 partial spinal cord injury. After 10 days of intubation she was extubated with a tracheostomy and aspen collar.
It was a constant struggle to keep the trachea above the opening of the aspen brace, and the patient never seemed to be comfortable.
If you’ve ever had a patient with an aspen collar and a tracheostomy, you understand the challenge of providing comfort and adequate oxygen.
In most circumstances, the best way to use a tracheostomy with a neck brace is to minimize pillows and use a brace with a large enough opening with a good fit.
Here are a few ideas on braces that may help and what you can do to modify an aspen collar.
The best neck brace for a tracheostomy

The best neck brace for a tracheostomy is still the aspen collar. It doesn’t fit well with a tracheostomy, but it can be cut and adjusted to fit right.
There are other brace options, and I would encourage you to experiment with different options until you find one that works best.
Here are a couple that you might consider.
You can also try modifying a soft collar by cutting a “U” shape at the bottom for the tracheostomy.
Be sure to always check with the physician before modifying or replacing the neck collar.
Materials to modify an Aspen Collar
If using an Aspen collar, here are supplies you will need.
- Scissors
- Replacement pads
- Foam dressing
If other options are available, use a neck brace with a larger opening near the tracheostomy.
How to modify an aspen collar for a tracheostomy
1. Check the size of the brace
First, it’s important the aspen collar is the correct size. If it’s too small or large, it can cause discomfort and poor alignment. It can also overlap.
2. Turn front pull wheel to adjust
Once the brace is on, adjust the front wheel by pulling and turning clockwise or counterclockwise. This can help increase the opening of the neck for the trach, but too much can extend the neck too much and cause discomfort.
You’ll also want to make sure the neck is in the proper alignment and not too flexed or extended.
3. Adjust Velcro padding for proper fit
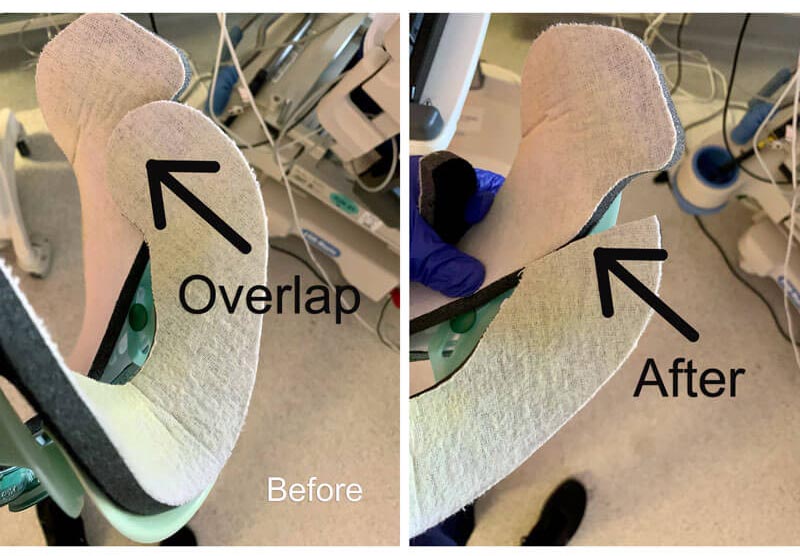
The Velcro padding needs to be adjusted, so the brace is fitted correctly and doesn’t overlap.
You should also adjust padding at the lower front part of the brace to increase room for the tracheostomy.
Remember to change out the padding for the neck brace regularly or wash it by hand.
4. Cut padding and brace if a better fit is needed
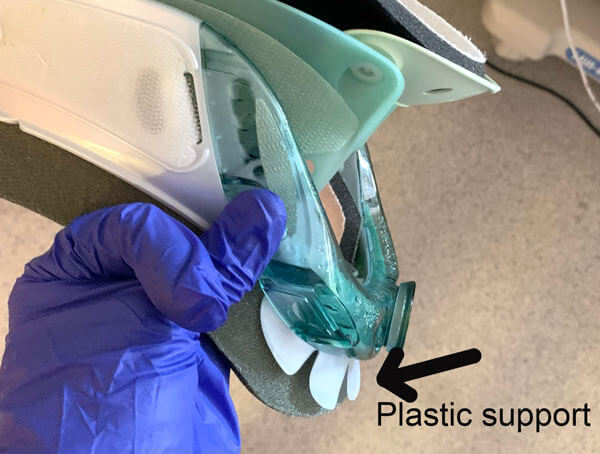
If there’s still not enough room for the tracheostomy, try cutting some of the plastic at the bottom of the brace. See image below.

You may also need to cut padding to reduce overlapping. See images below.

5. Place foam dressing under sternum
Extended wear of the aspen collar can place skin shearing near the sternum. I’ll usually place a foam dressing under the padding for comfort.
Foam dressings can also be placed in other areas of the skin causing discomfort from wearing the neck brace.

Bed positioning for a tracheostomy
Why is bed positioning for a tracheostomy so important?
Bed positioning can make the patient more comfortable and reduce irritation to the tracheostomy site. Here are a few simple tips to make bed positioning better for patients with a tracheostomy.
- Eliminate pillows
- Place foam under tracheostomy
- Keep the site clean
When the neck is flexed forward from pillows, the tracheostomy can cause irritation to the skin. Always eliminate pillows or provide a neck pillow for support.
If the neck is flexed too far forward and not in neutral, the tracheostomy can increase pressure on the skin. With the neck in a proper neutral position, a foam dressing under the tracheostomy can reduce further skin irritations and reduce mucus from reaching the skin.
Adaptive equipment for patients with a spinal cord injury and tracheostomy
Patients with a tracheostomy and spinal cord injury may only have partial movement of their upper extremities. If they still have elbow flexion and extension, they may be able to do their own suctioning and oral hygiene.
In this case, I recommend using an easy hold universal cuff grip. They can use the universal grip to suction and bring their hand to mouth for activities such as oral care and personal hygiene.
They can also use the easy hold cuff with a sharpie or dry erase marker to communicate.

I hope this was helpful. Be sure to subscribe to learn more about occupational therapy ideas for patient care.

David is the lead editor of OT Focus. He has been practicing as an Occupational Therapist since 2013. He specializes in acute care, hand therapy, and ergonomics.


